Payunit Developers #
Use the Payments API to easily and securely accept payments from multiple carriers in your app. If you have an online business and wish to receive payments from multiple payment service providers across the world, we’ve got you just the right solution. We call it Payunit.
Integration steps #
Even when something is useful enough, it also has to be simple enough to access. We make getting started a breeze for you. Just follow the next steps and you will be collecting payments in minutes.
- Create a payunit account and make sure to activate the account from the activation email you shall receive. [Required]
- Subscribe to a psp on your account. [Required]
- Add a Cashout account
- Integrate one of our APIs/SDKs to your site or app
Create a Payunit merchant account #
Before you can integrate Payments, you must create an account. For details, see Get started
Subscribe to a PSP #
PSPs are payment providers that lets you accept payments in your application. Currently supported PSPs include :
- MTN MOBILE MONEY
- ORANGE MONEY
- EXPRESS UNION MOBILE MONEY
- YUP
- VISA/MASTER CARD
- PAYPAL
Understanding KYC #
Every new merchant is subjected to certain transaction limits that are imposed by the payment providers we implement. These are regulations that help against fraud, money laundering and irregular transactions on the platform. The limits for new merchant accounts include :
- Process an equivalent of 100,000 CFA per month
- One PSP subscription
In order to increase these limits, merchants are required to further verify their identities on the platform. The following documentation and verification are required : - Two Factor Authentication – Verify the merchant phone number via SMS verification
- PERSONAL ID – submit a personal identification (a clear PDF or Image) of the representative of the merchant account
- BUSINESS LICENCE – Submit the operating business licence (a clear PDF or Image) of the merchant
Once this is verified and approved by an administrator, you will be able to process higher volumes of transactions per month and subscribe to more PSPs on your account. All three validations must be done before your account can subscribe to more than 1 PSP.
Submit verification NOW
Add and Remove Subscription #
Subscriptions are the different payment providers which are made available on your merchant dashboard. Currently, merchants can subscribe to:
- MTN Mobile money
- Orange Money
- Yup
- Express Union Money
- Credit Cards
- Paypal
To add a new subscription, make sure you are logged into your dashboard. Click the subscription tab on the left.
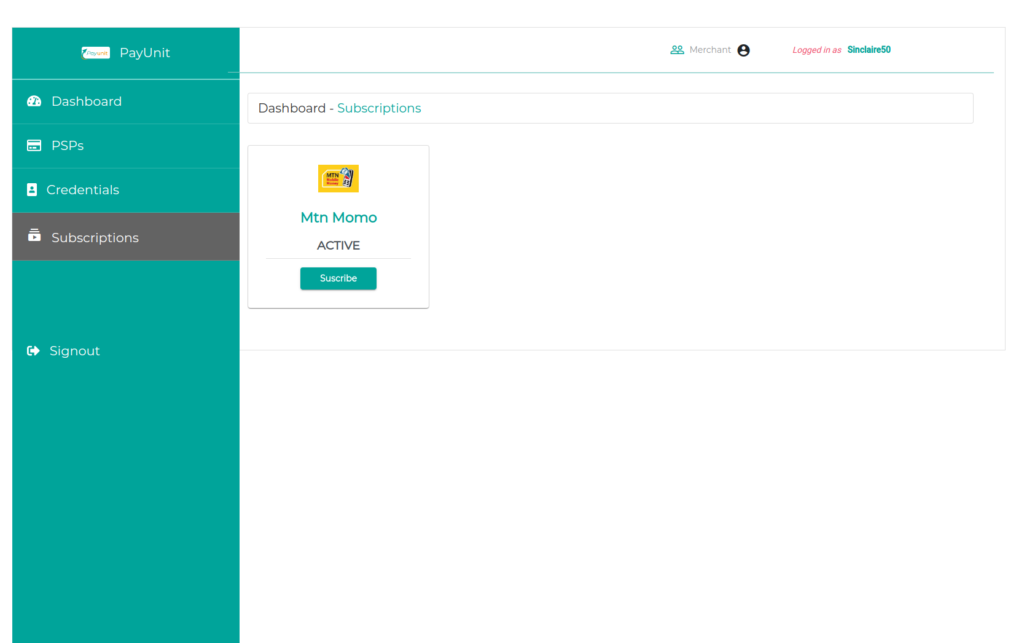
Click on the subscribe button to subscribe to active payment providers.
Note: For you to be able to subscribe to a certain number of payment providers, your account needs to be fully authenticated and activated and KYC
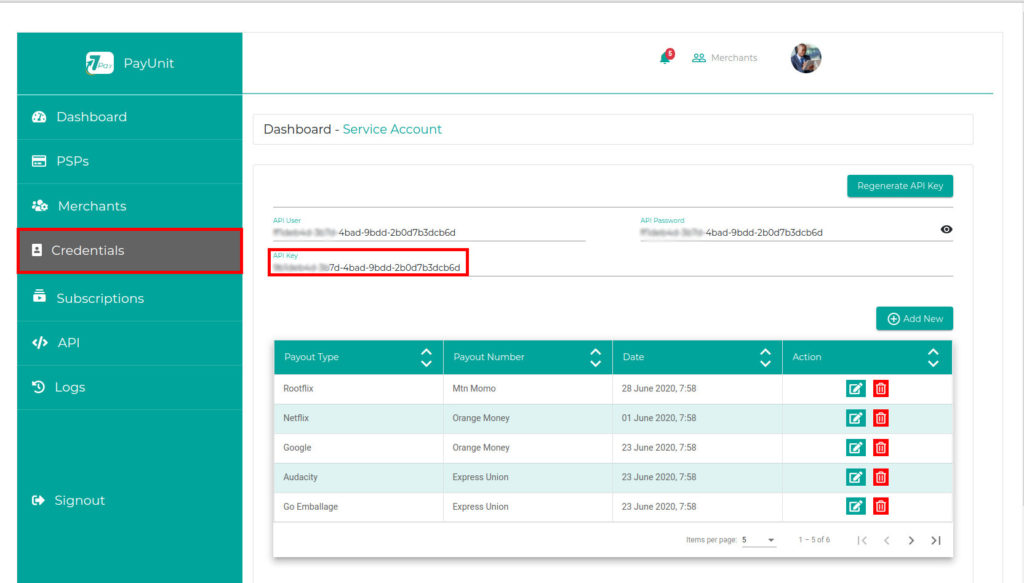
Getting your API credentials and setting your mode of operation #
Payunit offers developers the flexibility to test their payment integration in sandbox before going live [production].
To test your integration process in sandbox, you need to:
- Ensure every request you make to payunit, has a mode property in the request headers as test
- Use sandbox credentials
To get sandbox credentials, navigate to the credentials section on your dashboard. By default, the keys you will see there are sandbox credentials. Once your integration is complete and fully tested in sandbox, you can go live.
curl -X POST \

'https://app-payunit.net/api/gateway/initialize' \

-H 'Authorization: Basic cGF5dW5pdF9UU5LTg1MjMtZTEwZDZmMDg1ODk3' \

-H 'Content-Type: application/json' \

-H 'cache-control: no-cache' \

-H 'x-api-key: d97fe42bc01d26241a4fcd7f972cc85' \

-H 'mode: test' \

-d '{

"total_amount":"5000",

"transaction_id":"7852044502205",

"return_url":"https://google.com",

"description":"Payunit online payments",

"notify_url":"https://mysite.callback.com/payment_notify"

}'
To switch from sandbox to live mode, simply
- For every request you make to payunit, set a mode property in the request headers as live
- replacing your sandbox credentials with live credentials.
curl -X POST \

'https://app-payunit.net/api/gateway/initialize' \

-H 'Authorization: Basic cGF5dW5pdF9UU5LTg1MjMtZTEwZDZmMDg1ODk3' \

-H 'Content-Type: application/json' \

-H 'cache-control: no-cache' \

-H 'x-api-key: d97fe42bc01d26241a4fcd7f972cc85' \

-H 'mode: live' \

-d '{

"total_amount":"5000",

"transaction_id":"7852044502205",

"return_url":"https://google.com",

"description":"Payunit online payments",

"notify_url":"https://mysite.callback.com/payment_notify"

}'
To get your API credentials ( API key, API Username and API Password ) make sure you are a registered user.
Then click on the Credentials tab.
Cashouts #
Cashouts are transaction requests that you can initiate for deposits to be made to your cashout accounts. To receive a deposit, you must create a cashout account. Cashouts are usually processed within 24Hrs to 7 business days.
Cashout accounts are created using Cameroon MTN and Orange numbers. A cashout request can only be made with an amount of at least 1000XAF.
Sample Integration #
curl -v -X POST https://api.payunit.com/v1/payments/payment \
  -H "Content-Type: application/json" \
  -H "Authorization: Bearer <Access-Token>" \
  -d '{
  "intent": "sale",
  "payer": {
    "payment_method": "xxxx"
  },
A successful response provides a URL to redirect to in order to complete the payment. All transactions can be visualized on your dashboard.
NEXT
Using the payunit SDK in your applications.
Choose which SDK you need to use.